
EOQO OUTDOOR NETWORKING SUPPORT
Extend Your Network to Another Building
Use this guide to install an EOQO wireless bridge between a home, shop, barn, warehouse, camera site, or remote building. Start with the model number and port labels on your equipment. The correct wiring depends on the bridge version.

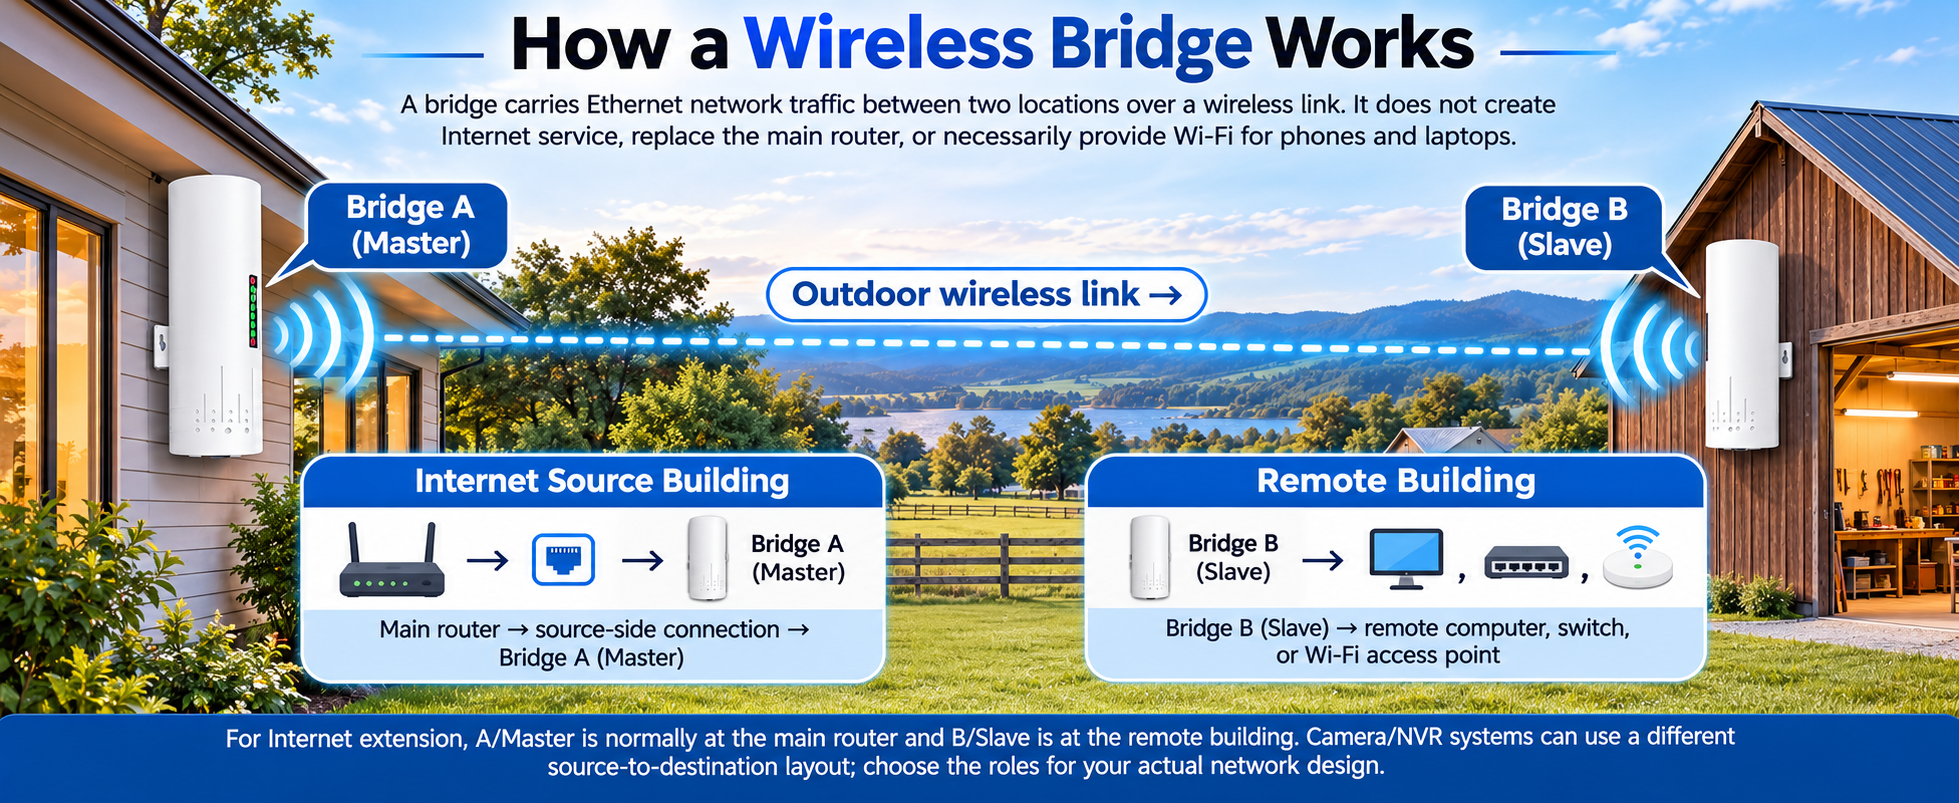
How a Wireless Bridge Works
A bridge carries Ethernet network traffic between two locations over a wireless link. It does not create Internet service, replace the main router, or necessarily provide Wi-Fi for phones and laptops.
Internet Source Building
Main router → source-side connection → Bridge A (Master)
Outdoor wireless link →
Remote Building
Bridge B (Slave) → remote computer, switch, or Wi-Fi access point
Step 1: Identify Your Model Before Connecting Power
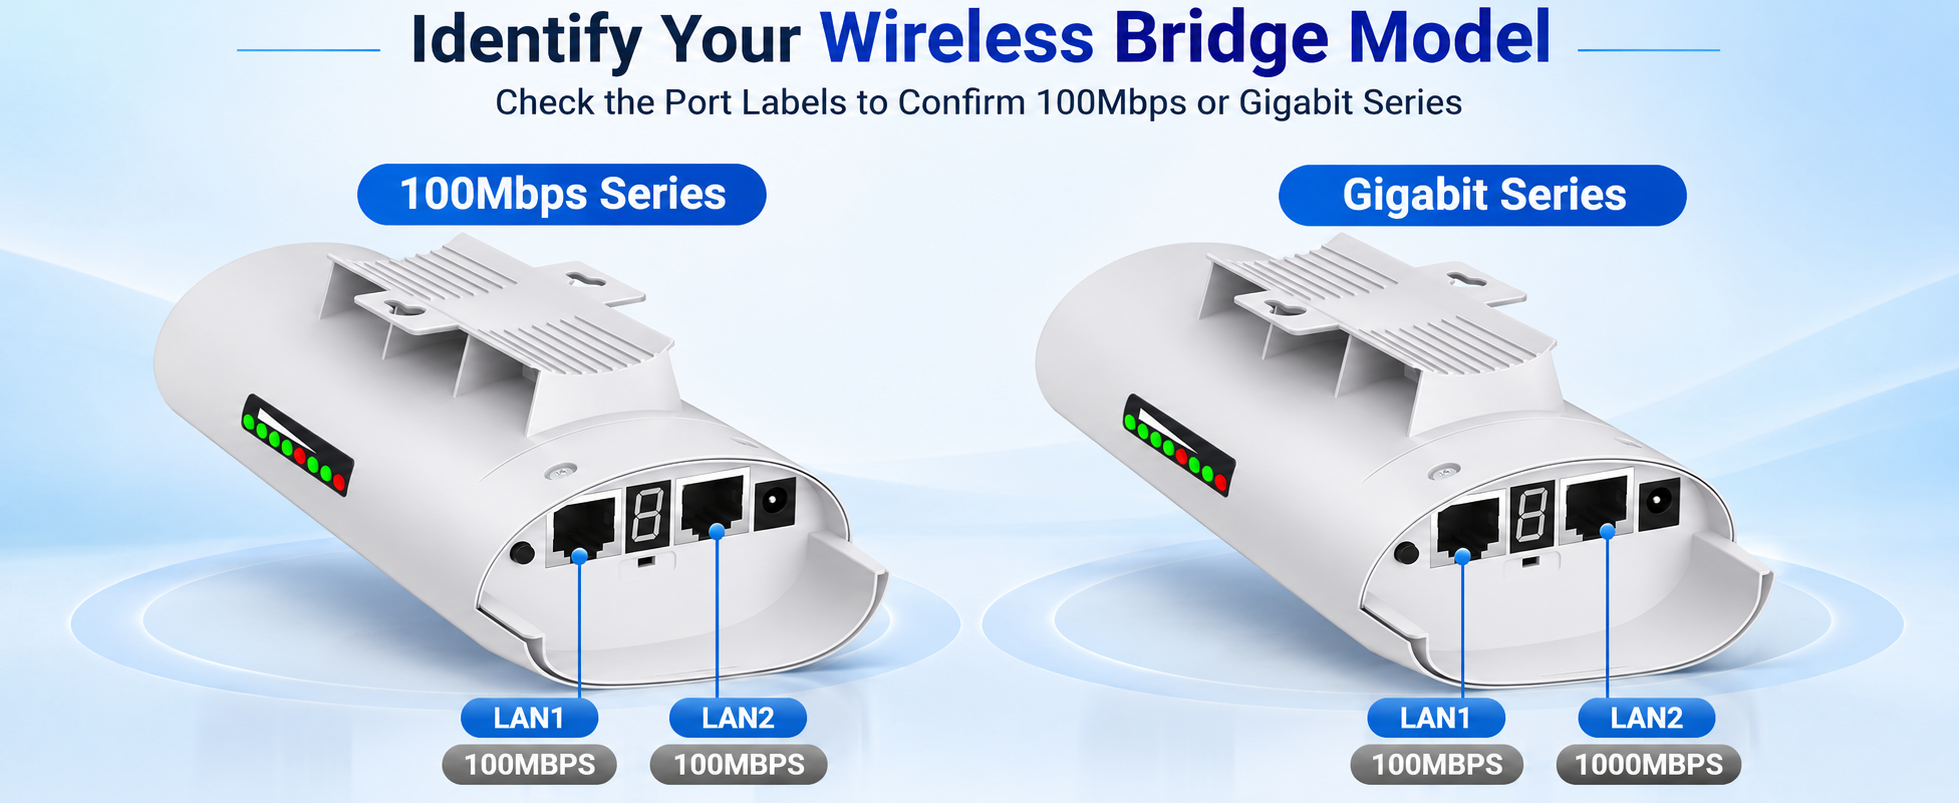
Find the model number on the CPE label and check the port labels on both the CPE and PoE injector. Similar-looking bridge units can have different Ethernet ports, power requirements, pairing modes, and indicator meanings.
100Mbps Series
- The supplied 100Mbps manual lists two 10/100Mbps Ethernet ports.
- The package list includes 24V PoE injectors.
- The guide provides Auto Mode and Custom Mode for supported models.
- Start with the factory pairing and Auto Mode unless your model or network setup requires configuration.
Gigabit Series
- Port layouts vary. Some versions combine a 10/100 PoE port with a separate Gigabit data port.
- The EOQO quick guide describes automatic pairing for the Gigabit series.
- A Gigabit Ethernet port does not guarantee Gigabit wireless or Internet throughput.
- Follow the connection diagram that matches your model and physical port labels.
Step 2: Bench-Test the Pair Before Mounting
- Check the kit. Confirm the CPE model labels, injector ratings, cables, and factory pairing information.
- Set Master and Slave. For Internet extension, set the source-side unit to A/Master and the remote unit to B/Slave if your model has an A/B switch.
- Use the correct port diagram. Follow the wiring instructions for the 100Mbps or Gigabit model below. Do not mix the two layouts.
- Power both radios. Wait for startup and pairing. Use the indicator chart in your exact manual; LED and display meanings can vary by model.
- Test the far-end connection. Connect a laptop to the Slave-side network output. Confirm it receives a valid IP address and can reach the Internet.
- Mount and align. After the bench test passes, install the bridges outdoors with a clear path between them. Point the front panels toward one another and fine-tune alignment.
Use Cat5e or better cable and follow the cable-length limit in your model manual. Secure outdoor cable runs and use weather-rated fittings, grounding, and surge protection where required by the installation.
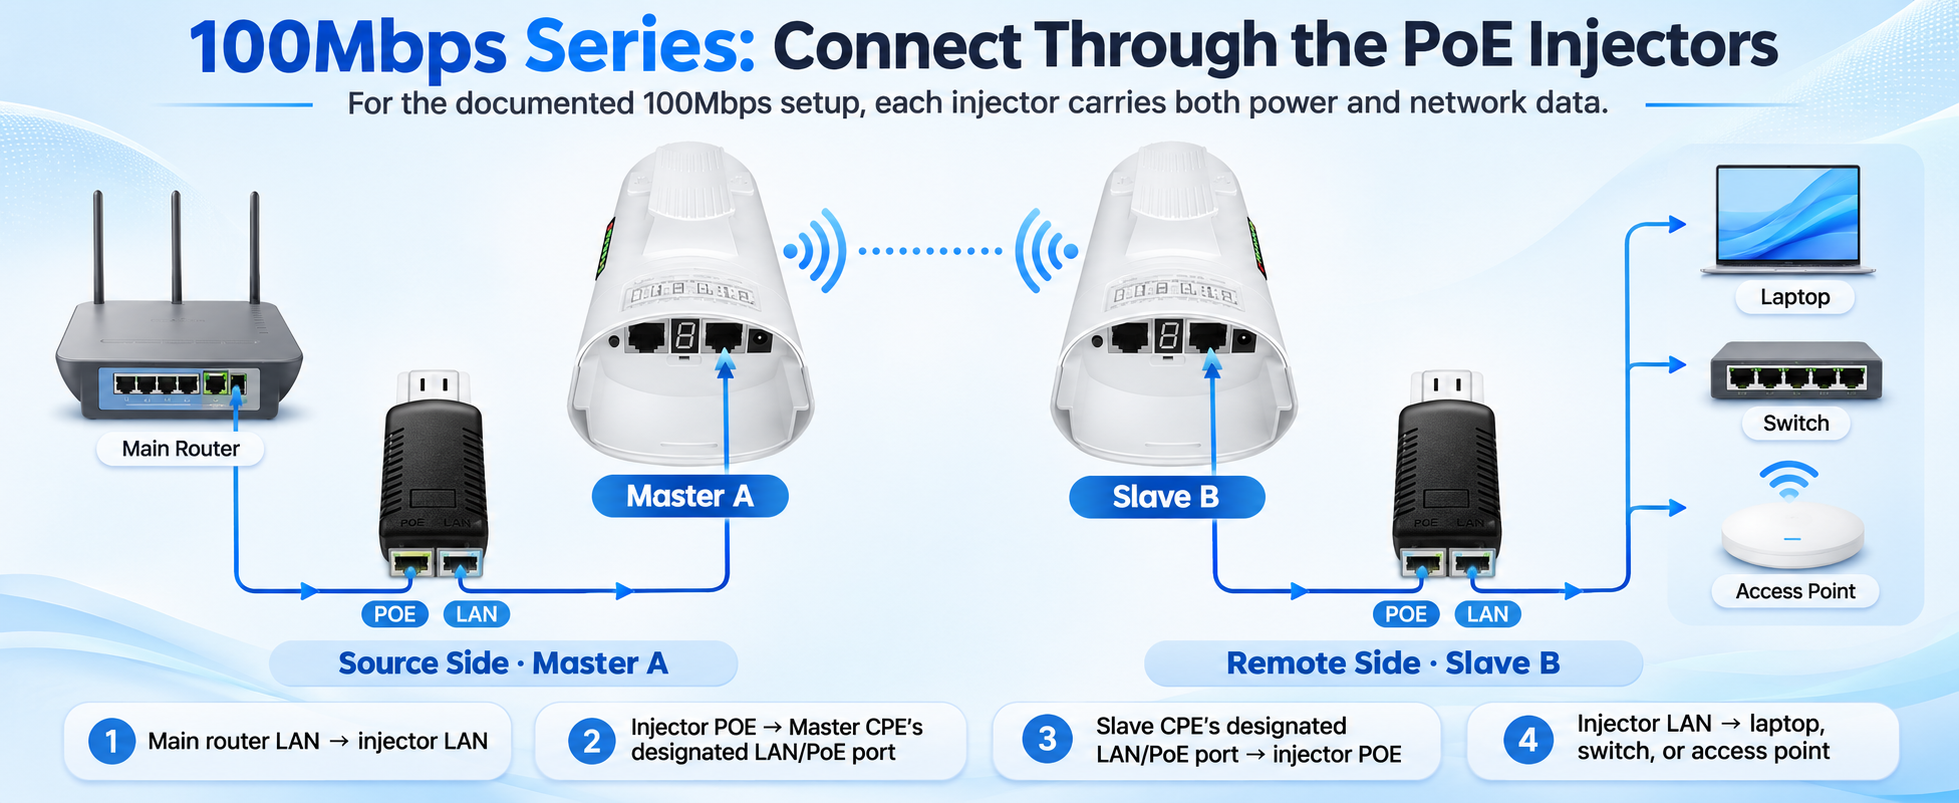
100Mbps Series: Connect Through the PoE Injectors
For the documented 100Mbps setup, each injector carries both power and network data.
Source Side · Master A
Main router LAN → injector LAN
Injector POE → Master CPE’s designated LAN/PoE port
Remote Side · Slave B
Slave CPE’s designated LAN/PoE port → injector POE
Injector LAN → laptop, switch, or access point
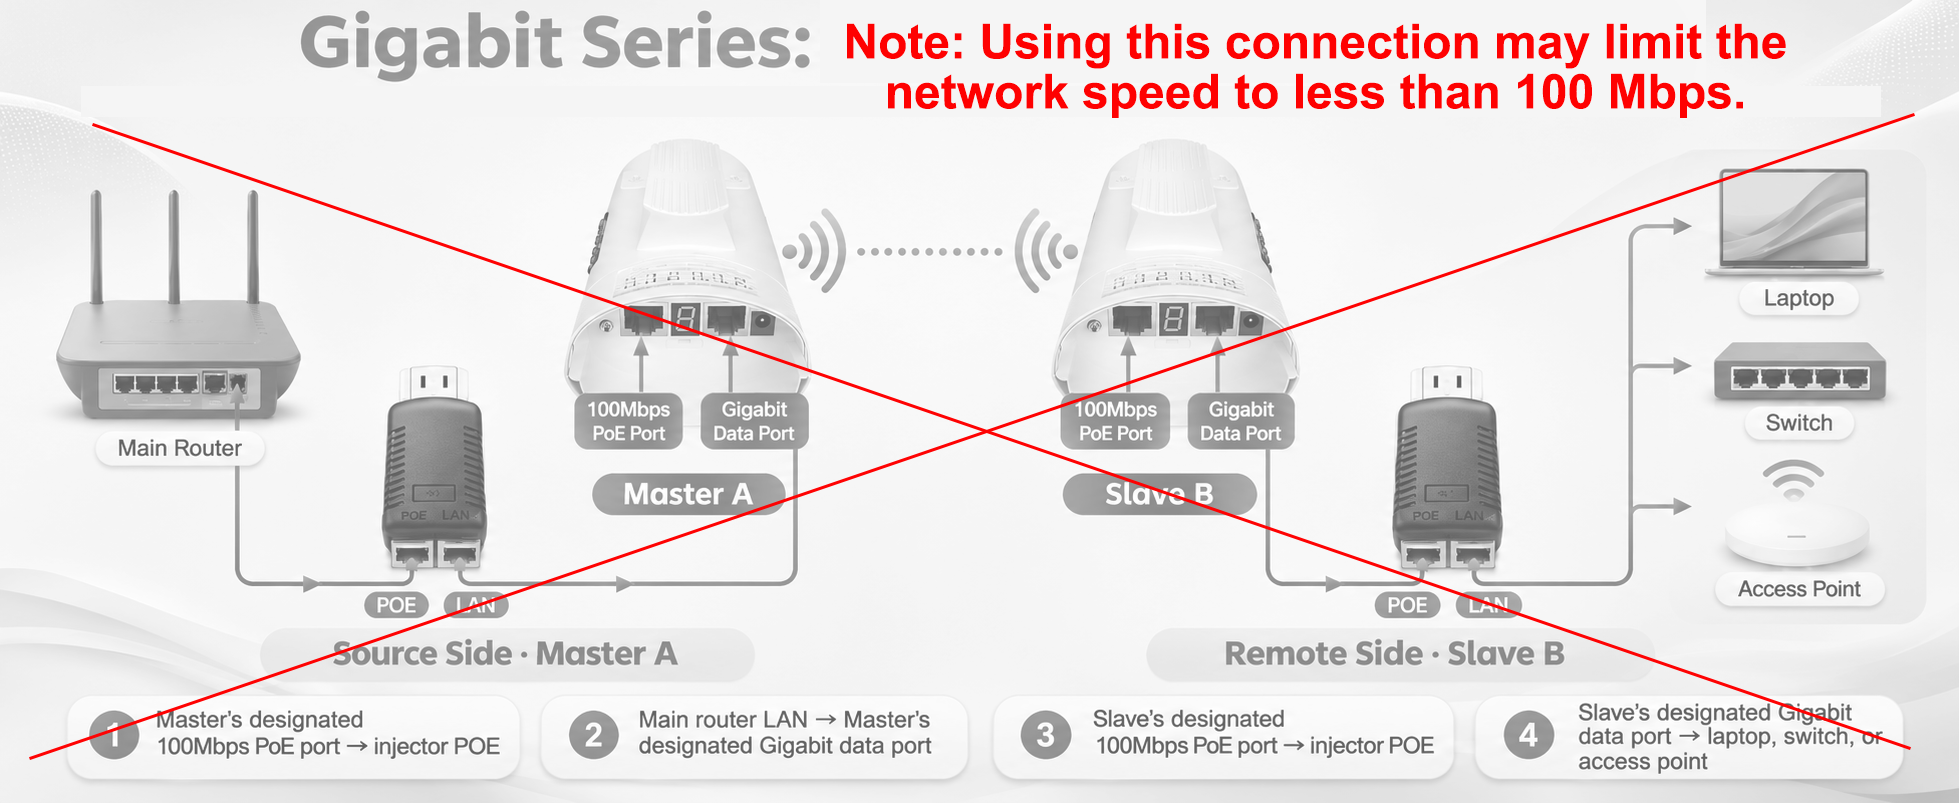
Gigabit Series: Check the Port Layout Carefully
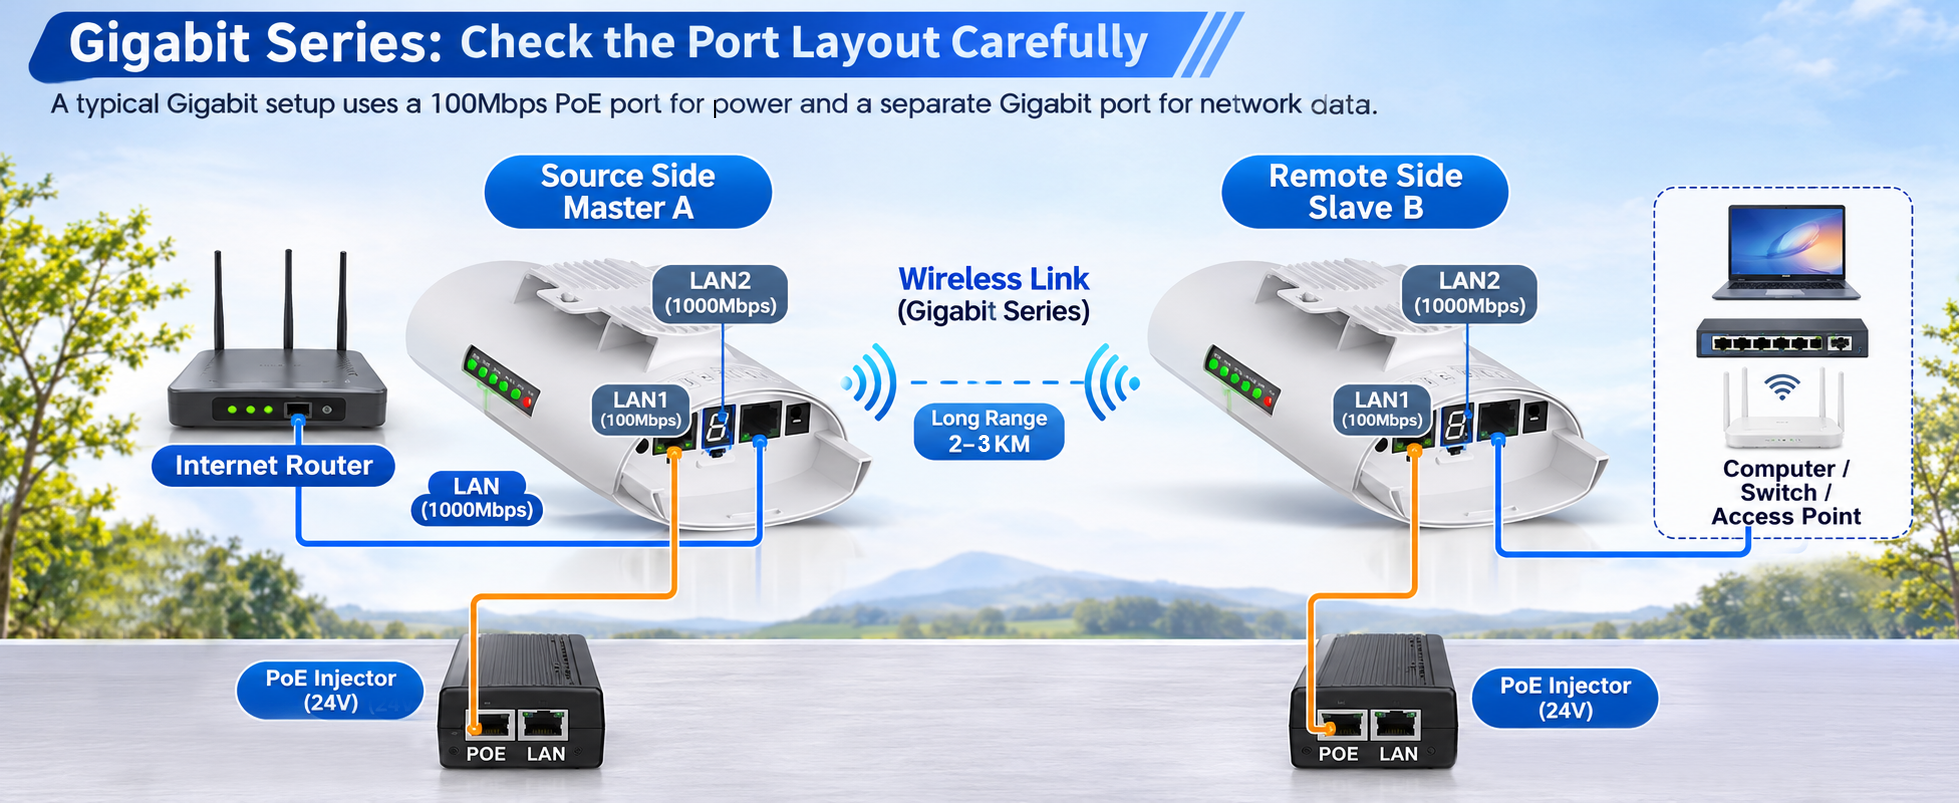
The supplied Gigabit manual documents a layout where a 100Mbps CPE port provides PoE power and a separate Gigabit port carries network data.
Source Side · Master A
Master’s designated 100Mbps PoE port → injector POE
Main router LAN → Master’s designated Gigabit data port
Remote Side · Slave B
Slave’s designated 100Mbps PoE port → injector POE
Slave’s designated Gigabit data port → laptop, switch, or access point
Step 3: Extend Starlink Internet to Another Building
- Check whether your Starlink kit provides an Ethernet LAN output. If it does not, use the Ethernet adapter compatible with that Starlink router generation.
- Connect the Starlink Ethernet output to the Master-side network path shown in the EOQO manual for your exact bridge model.
- At the remote building, connect a laptop directly to the Slave-side network output and verify Internet access.
- If you add a remote Wi-Fi router to extend the same network, set it to Access Point mode and leave DHCP enabled on the main router. Use a WAN connection only when you intend to create a separately routed network.
Starlink Ethernet options differ by generation. Check Starlink’s current Ethernet-port guidance for your kit before ordering an adapter.
For detailed setup and installation instructions for Starlink Gen 2, Gen 3, Gen 4 (V4), Gen 5 (V5), Enterprise, Mini, and Mini X, please visit the official Starlink Setup Guide
Need Wi-Fi at the Remote Building?
A wireless bridge provides a wired network connection at the far end. For dependable Wi-Fi coverage, connect a separate access point or a Wi-Fi router configured in AP mode to the Slave-side network output. Keep DHCP on the main router when both buildings should share one network.
Some bridge models document a built-in Wi-Fi or hotspot feature, but support and default settings vary. Confirm the exact CPE model and firmware before relying on it. The bridge’s Wi-Fi password and web-management login are different credentials.
Troubleshooting: Start With a Direct Wired Test
The bridge signal is on, but the remote building has no Internet
- Connect a laptop directly to the Slave-side LAN/data output.
- Check that the laptop receives an IP address, gateway, and DNS from the main router.
- Verify injector LAN/POE direction, CPE port labels, and the Ethernet link light.
- If the laptop works but a remote router does not, check its AP/WAN mode and DHCP settings.
The speed is low or unstable
- Test the bridge pair close together with known-good short cables.
- Check negotiated Ethernet speed at the CPE, injector, router, switch, and computer.
- Check alignment, line of sight, obstructions, cable condition, and nearby interference.
- Compare a wired local-network test with an Internet speed test. Ethernet port speed and advertised wireless link rate are not guaranteed Internet throughput.
The radios will not pair
- Confirm both units have power and the correct A/B roles when applicable.
- Keep factory pairing settings if the link connects automatically.
- If manual pairing is required, follow the exact model’s channel procedure and indicator chart.
- Do not reset until you have confirmed the model-specific reset method and can restore its settings.
The injector light blinks or one bridge will not power up
- Confirm the injector voltage and polarity match the CPE label.
- Power down and inspect the port connections; test with a short, known-good Cat5e cable.
- Swap only one confirmed-compatible cable or injector at a time and note whether the symptom follows that component.
- Record the model label and indicator pattern before contacting support.
Wireless Bridge Installation FAQ
Which unit connects to the main router?
For Internet extension, A/Master is normally at the main router and B/Slave is at the remote building. Follow your model’s port diagram.
Do I need a second router at the remote building?
No, not for a wired computer, switch, or camera network. Add an access point or AP-mode router only when you need Wi-Fi coverage there.
Can I connect several cameras?
A network switch may be needed for multiple cameras. Cameras need their own power or compatible PoE source; the bridge is not automatically a multiport PoE switch. Confirm that your exact model supports the required point-to-multipoint setup and traffic load.
Does a Gigabit port mean 1,000 Mbps wireless speed?
No. Check the exact model’s wired port layout and wireless performance specifications. A 10/100 port limits that wired segment, and a Gigabit Ethernet port does not guarantee 1,000 Mbps over the wireless link or Internet.
Can one Master connect to multiple Slaves?
Only when the exact model and firmware support point-to-multipoint operation. Confirm the supported radio count, channel settings, placement, and network traffic before purchasing or installing more units.
Need Help With Your EOQO Setup?
Send support the CPE model number, photos of the CPE and injector port labels, a simple wiring diagram, and the indicator-light pattern. Include what you tested and the result.