
EOQO TECHNICAL SUPPORT | ENGLISH INSTALLATION GUIDE
Connect an EOQO Wireless Bridge to Starlink
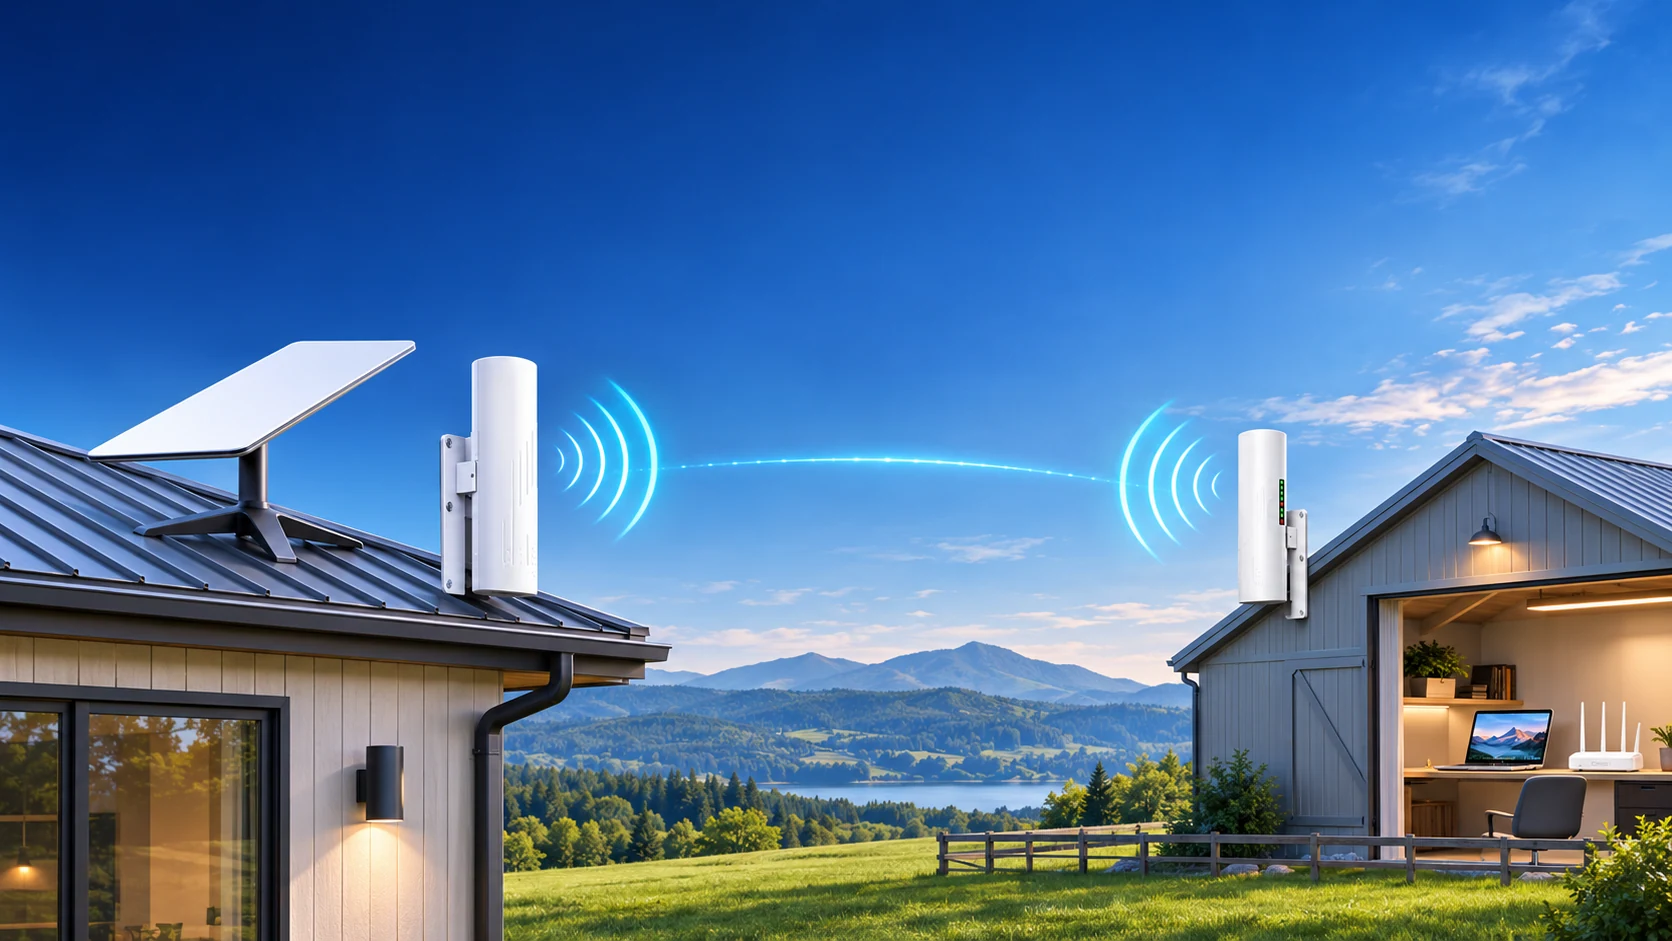
Learn how to extend a Starlink Ethernet connection to another building with an EOQO Master and Slave wireless bridge. This guide covers Standard 4 / V4, Standard 4 X, Mini, Mini X, V5, Standard Actuated / Gen 2, Enterprise, and Performance kits.
1. Identify your Starlink kit
Select the wired Ethernet output that matches your actual Starlink router and power supply. Standard 4 and Standard 4 X use different included routers.
- Standard 4 / V4: Router Mini LAN output
- Standard 4 X (sometimes called Gen 3): Router 3 LAN 1 or LAN 2
- V4 with a separately supplied router: Confirm its WAN uplink and active LAN output
- Starlink Mini: Integrated Mini Ethernet output with a compatible waterproof cable
- Starlink Mini X: Router Mini LAN output after its upstream link is working
- Starlink V5: Router Mini LAN output
- Standard Actuated / Gen 2: Starlink Ethernet Adapter RJ45 output
- Starlink Enterprise: Ethernet output on its Starlink power supply
- Performance Gen 3: LAN port on the Advanced Power Supply
- Performance Gen 2: Ethernet output on its dedicated power supply
2. How the two wireless bridges work
The Master bridge receives Ethernet from the Starlink-side network. A paired Slave bridge delivers Ethernet to the remote building. You can connect a computer, Ethernet switch or correctly configured wireless access point at the remote side.
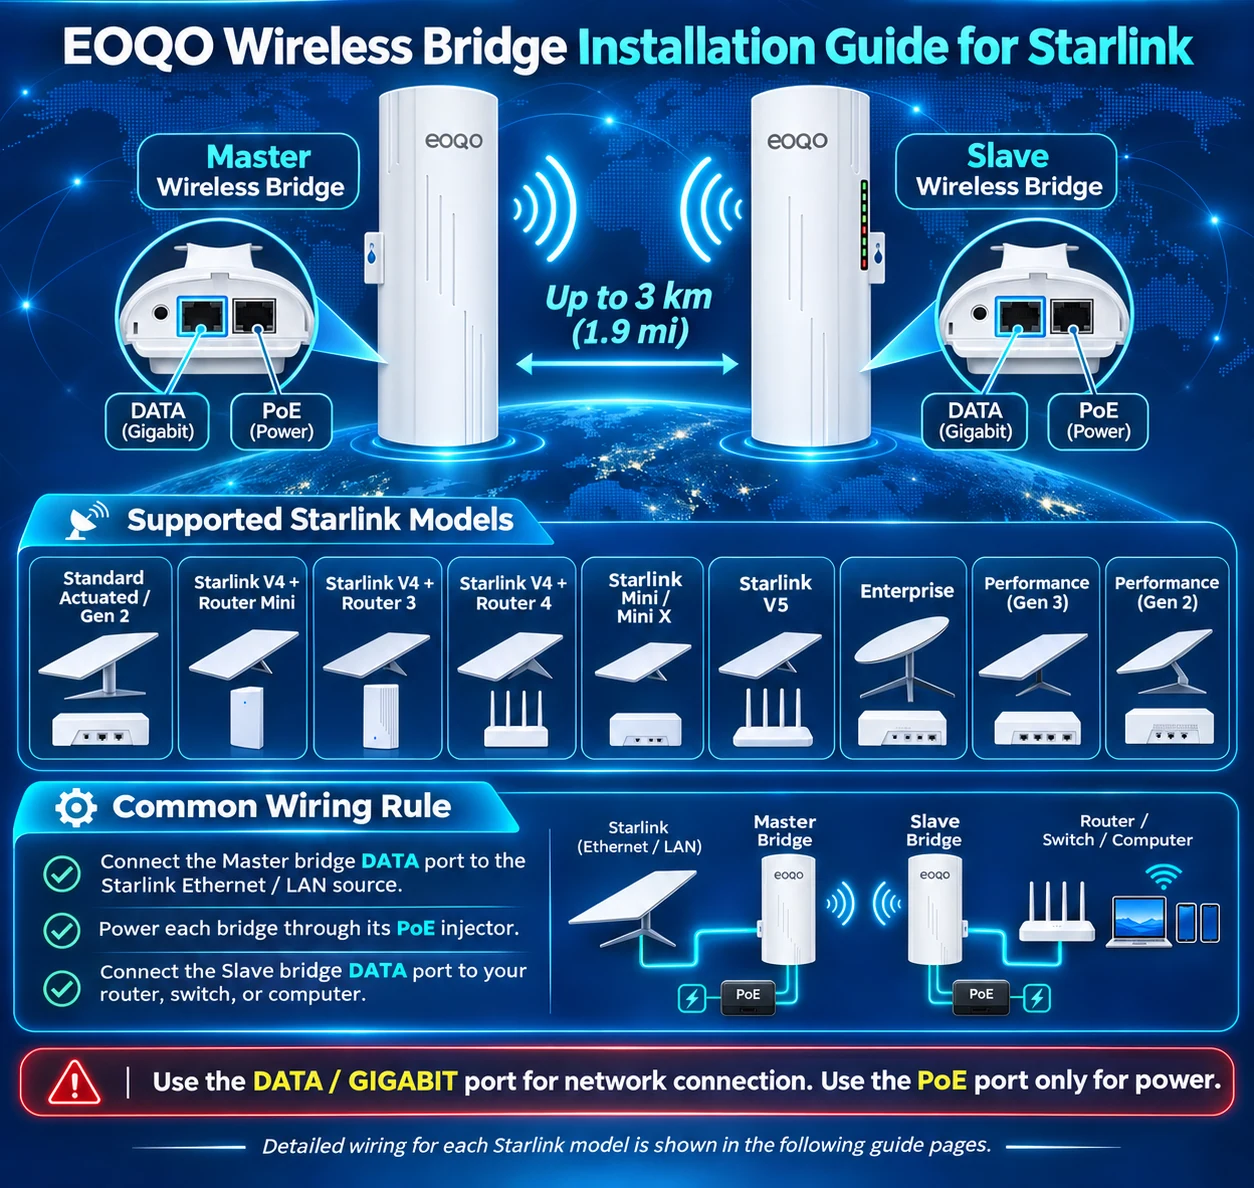
Before connecting power: Identify your EOQO bridge model. Some 100 Mbps bridge models carry Ethernet through the PoE injector. Other Gigabit models provide separate DATA and PoE sockets. Follow the matching connection steps in Section 4.
3. Model-specific wiring diagrams
3A. Standard 4 / V4 with Router Mini
The Starlink Standard 4 package includes a Router Mini and a Starlink Dual PoE power supply.
- Install the Starlink V4 dish, Dual PoE supply and Router Mini with their original Starlink cables. Confirm Starlink Internet access.
- Connect the Router Mini LAN output to the EOQO Master network/data input, following the port configuration for your bridge SKU.
- Power both EOQO bridges using their specified injectors. Connect the Slave-side data output to the remote network.
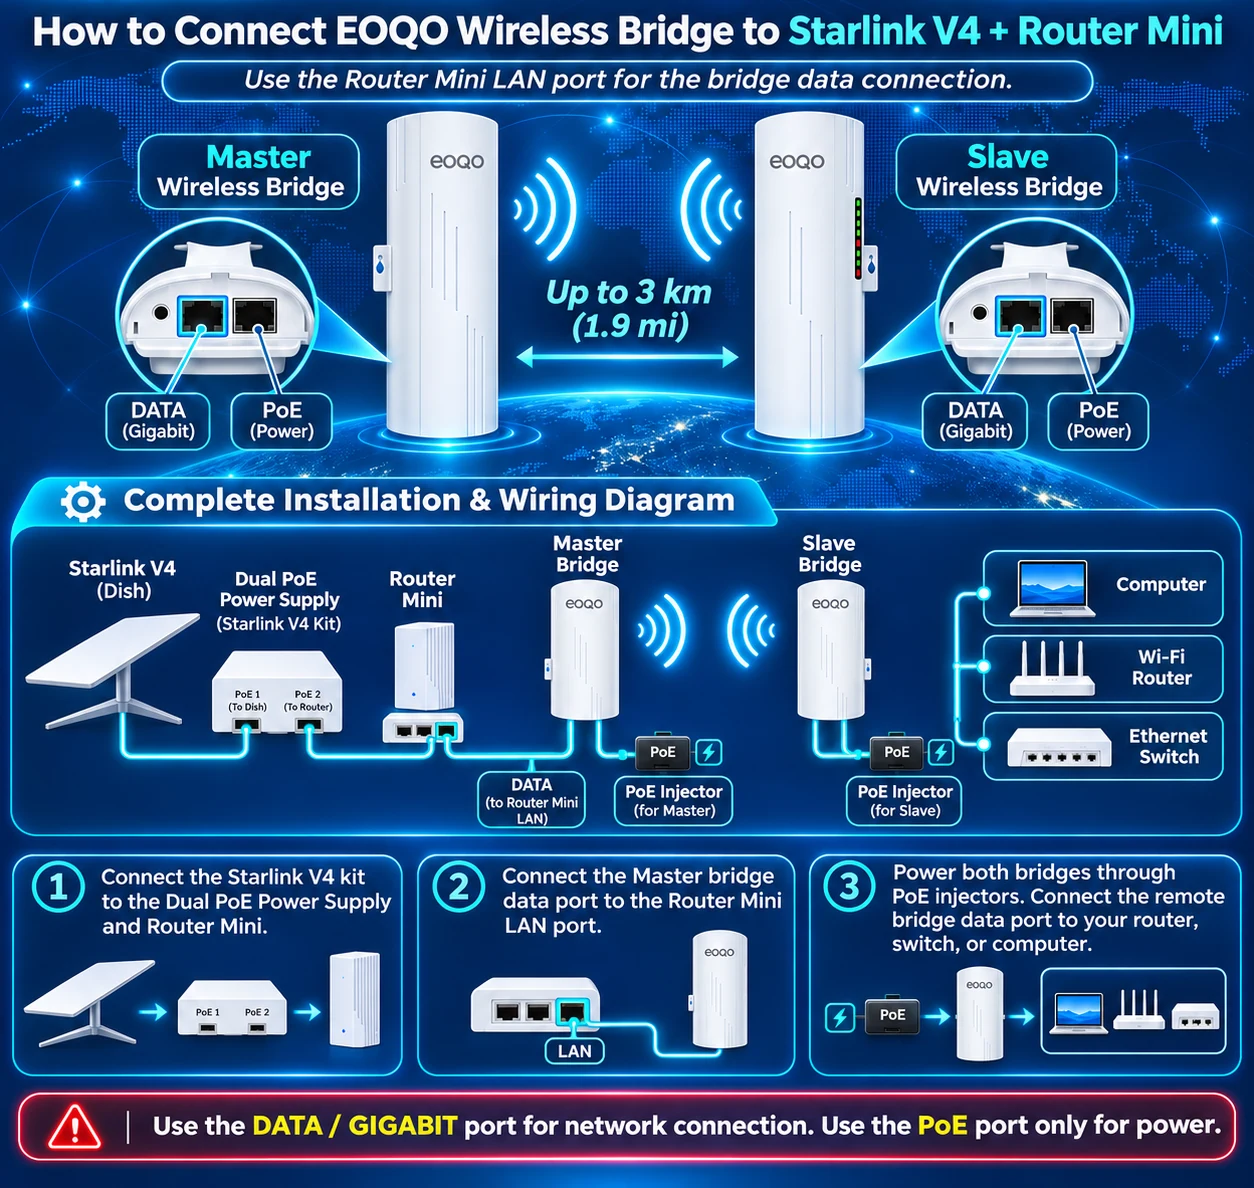
Installation note: Do not substitute the Starlink Dual PoE power supply for an EOQO bridge power injector.
3B. Standard 4 X / Gen 3 with Router 3
The Standard 4 X kit supplies a Router 3 with two wired LAN ports.
- Set up the Standard 4 X dish and Router 3, keeping the original Starlink power wiring intact.
- Open the Router 3 LAN-port cover. Connect either LAN port to the EOQO Master data/network side.
- Power and align the Master and Slave bridges, then connect the remote-side data output.
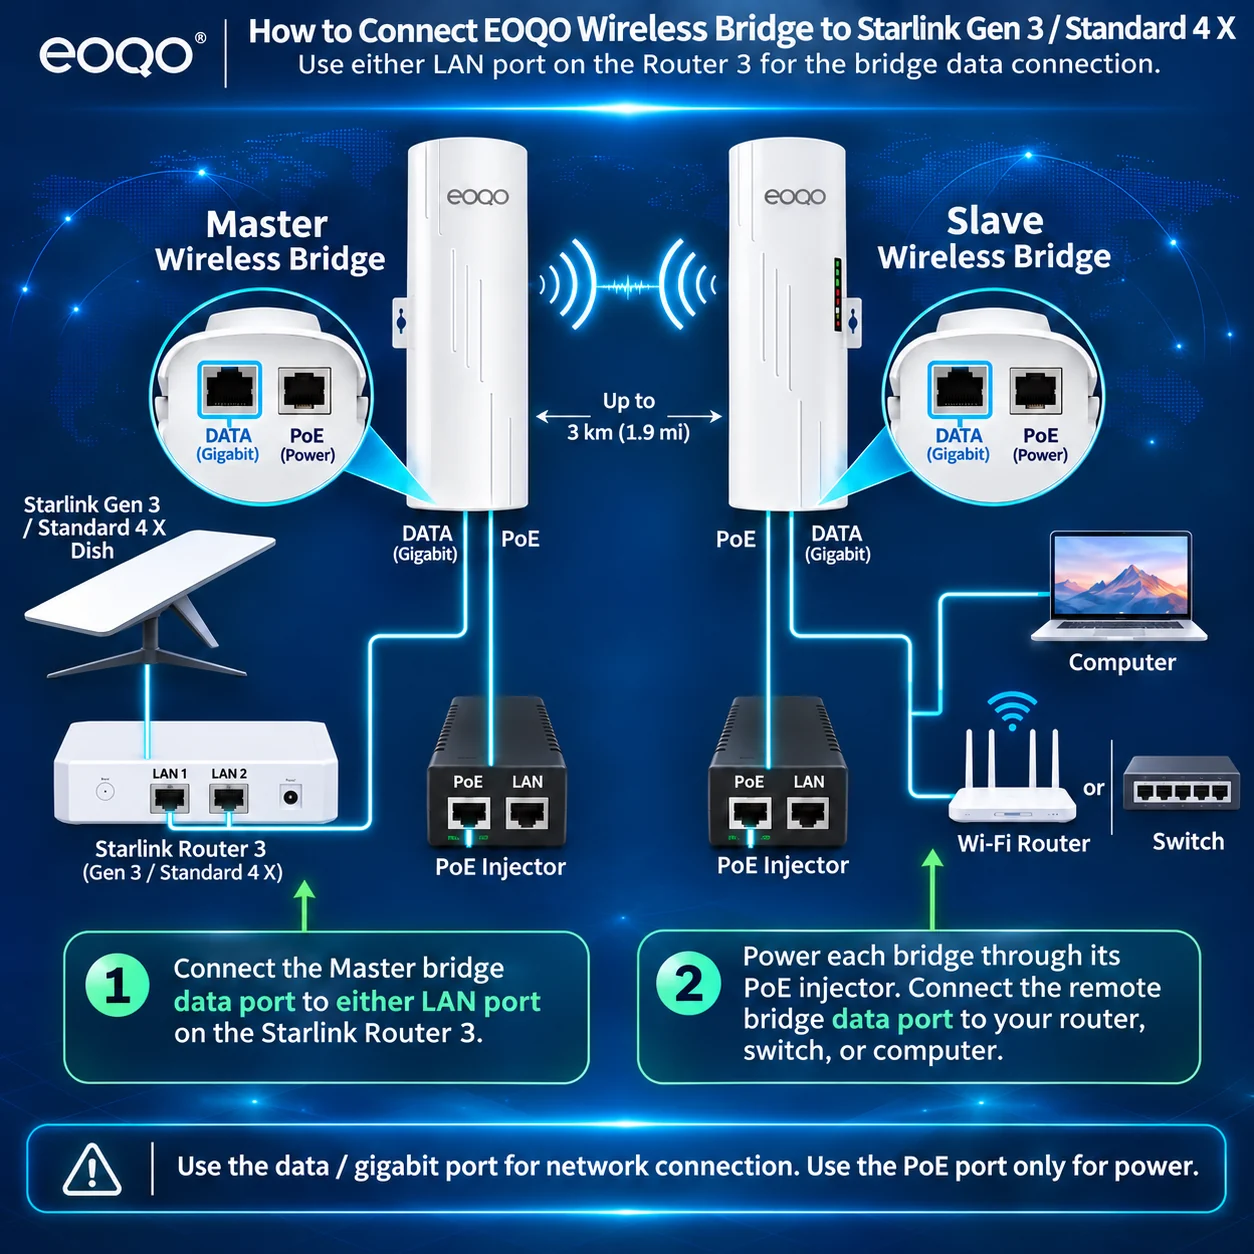
Installation note: Do not confuse Standard 4 X / Router 3 with Standard 4 / Router Mini.
3C. V4 with a separately supplied router
This is a custom network configuration, not a verified official Starlink "Router 4" kit.
- Identify the exact third-party or separately supplied router model. Verify that it already receives a working Starlink uplink.
- Connect its confirmed LAN output to the EOQO Master data/network side.
- Use the correct EOQO power injectors and configure the remote network according to its topology.
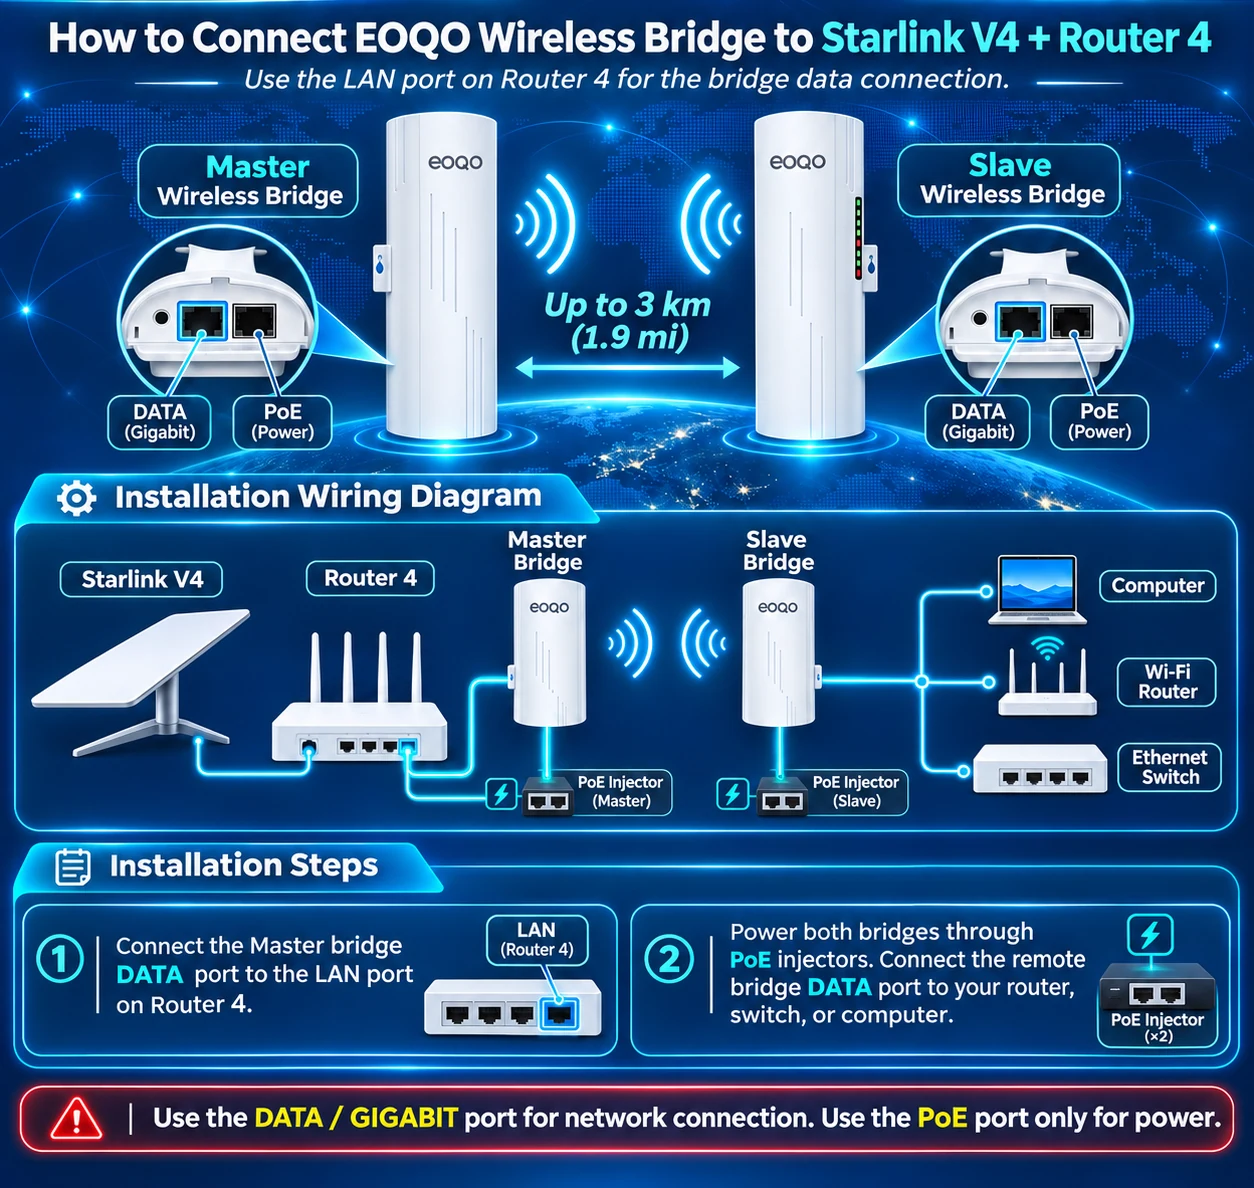
Installation note: The router drawing is illustrative only. Do not rely on pictured WAN or LAN socket positions.
3D. Starlink Mini and Mini X
Mini has built-in Wi-Fi. Mini X configurations may also use a Router Mini.
- Mini: Power the Mini and use its approved, weather-sealed Ethernet cable to reach the EOQO Master data/network input.
- Mini X: First establish the Router Mini upstream connection. Use its LAN output, not its WAN/uplink socket, for the EOQO Master.
- Power and align the EOQO bridge pair and connect its Slave-side data output to the remote network.
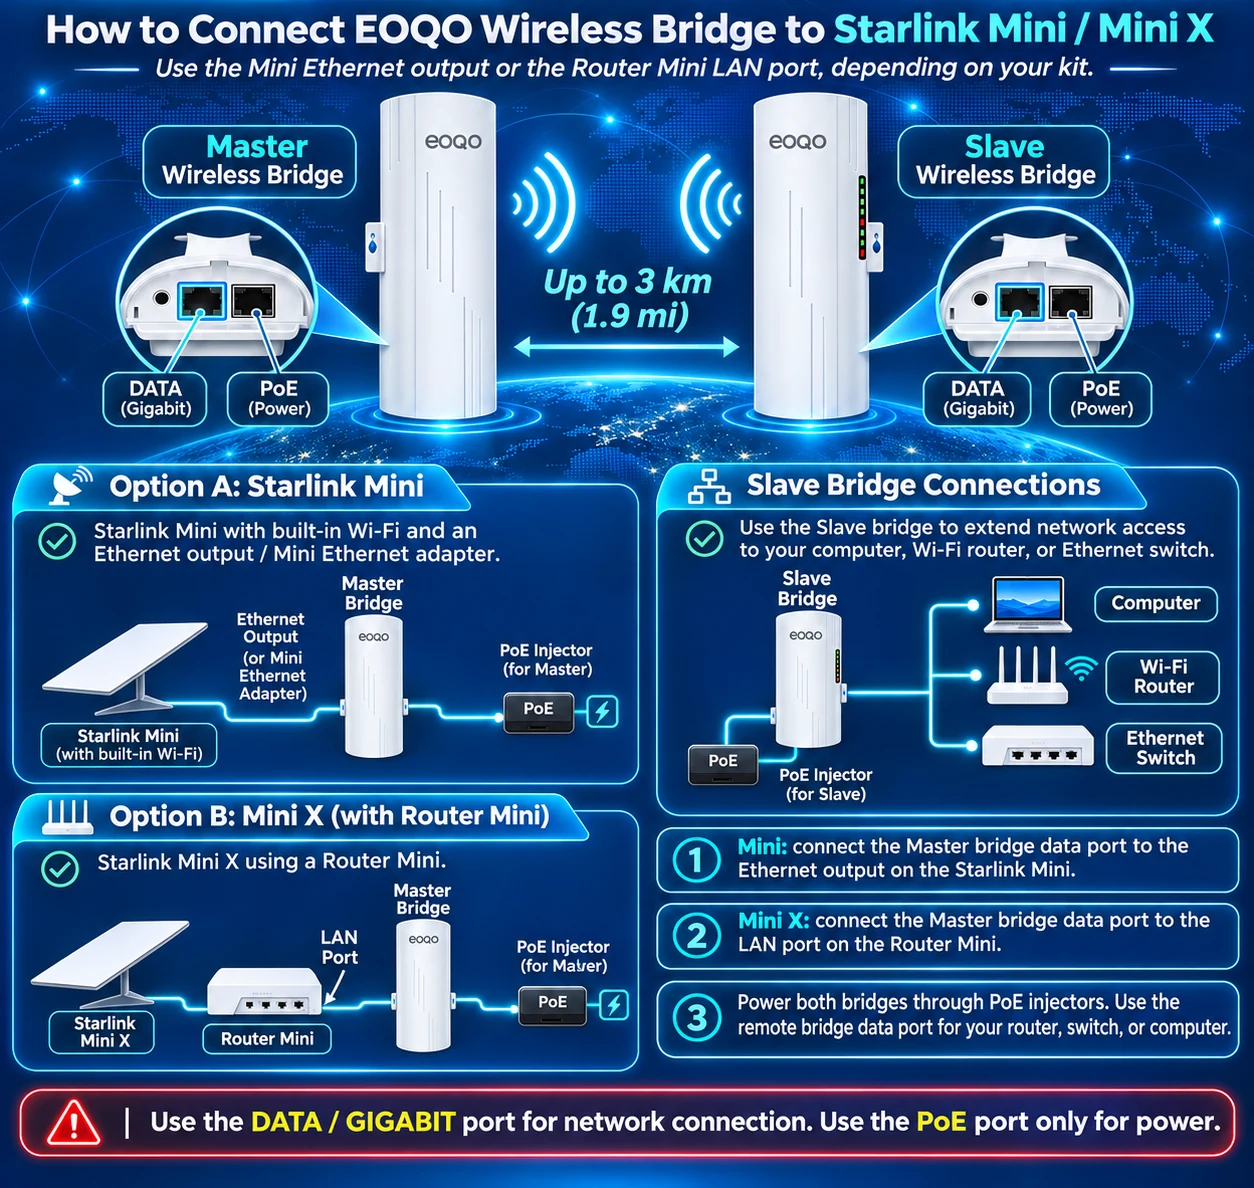
Installation note: Protect the Mini outdoor Ethernet connection against moisture. The router must have a functioning upstream link before testing the bridge.
3E. Starlink V5
V5 kits include a Router Mini and Starlink Dual PoE power supply.
- Install and power the Starlink V5, Starlink Dual PoE power supply and Router Mini using the kit instructions.
- Run Ethernet from the Router Mini LAN socket to the EOQO Master bridge network/data side.
- Power both EOQO bridges separately and attach the Slave-side data output to your remote devices.
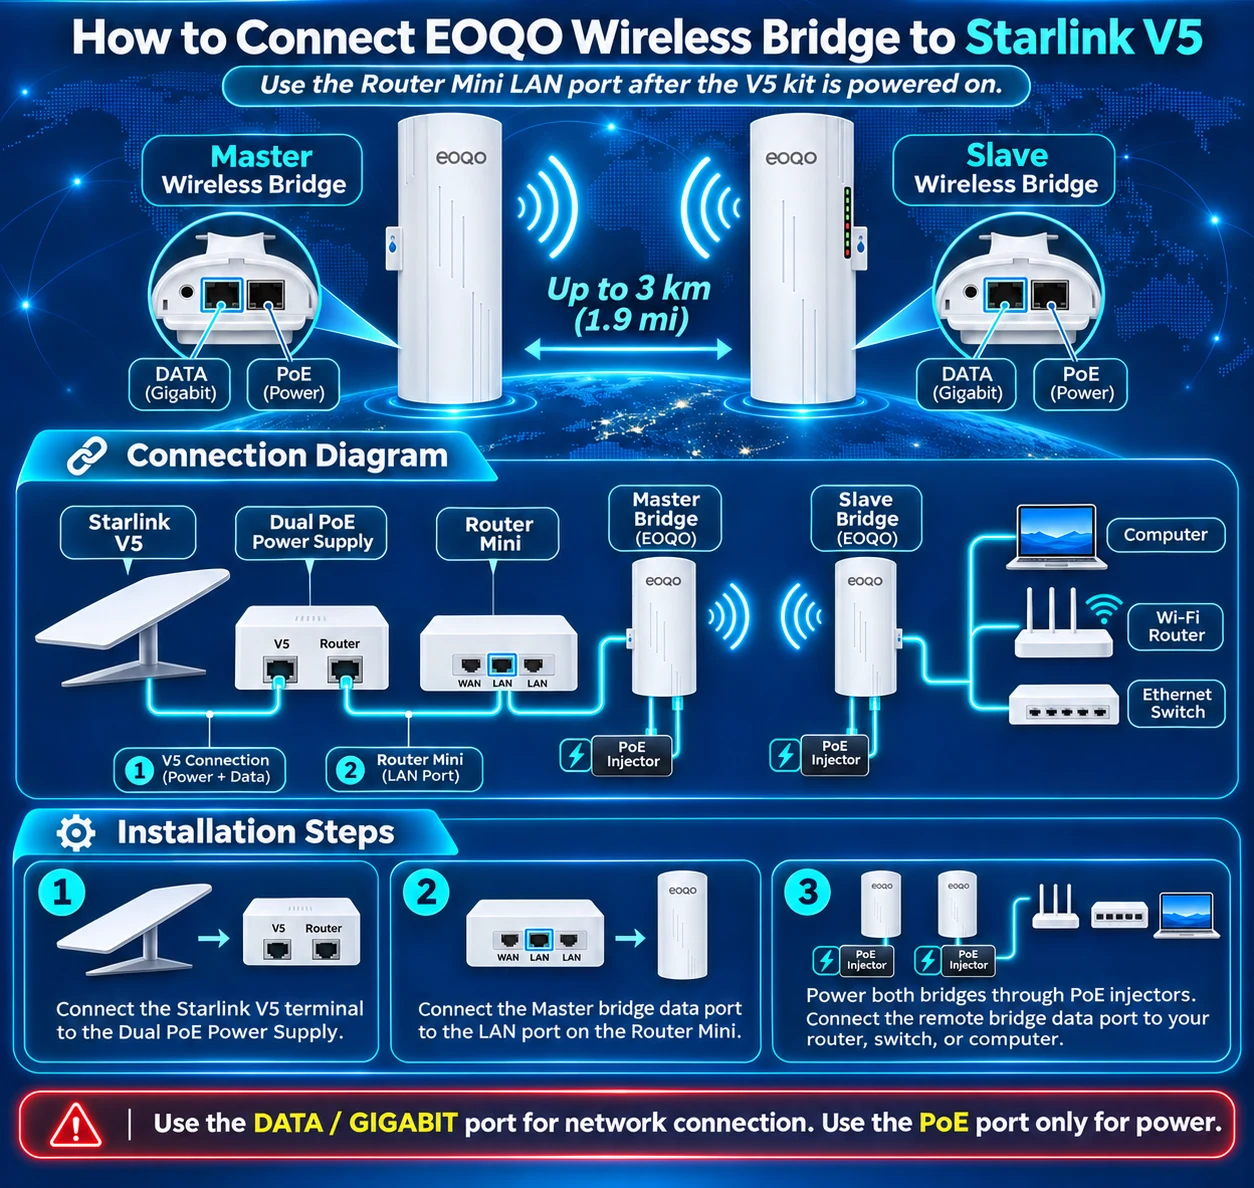
Installation note: The Starlink Dual PoE equipment powers Starlink hardware, not EOQO bridges.
3F. Standard Actuated / Gen 2
Gen 2 has no built-in LAN socket on its original router. Use a Starlink Ethernet Adapter.
- Install the Gen 2 router and its Ethernet Adapter according to the Starlink instructions.
- Connect the adapter RJ45 Ethernet output to the EOQO Master data/network side.
- Power the bridge pair using its own specified injectors and attach remote devices at the Slave side.
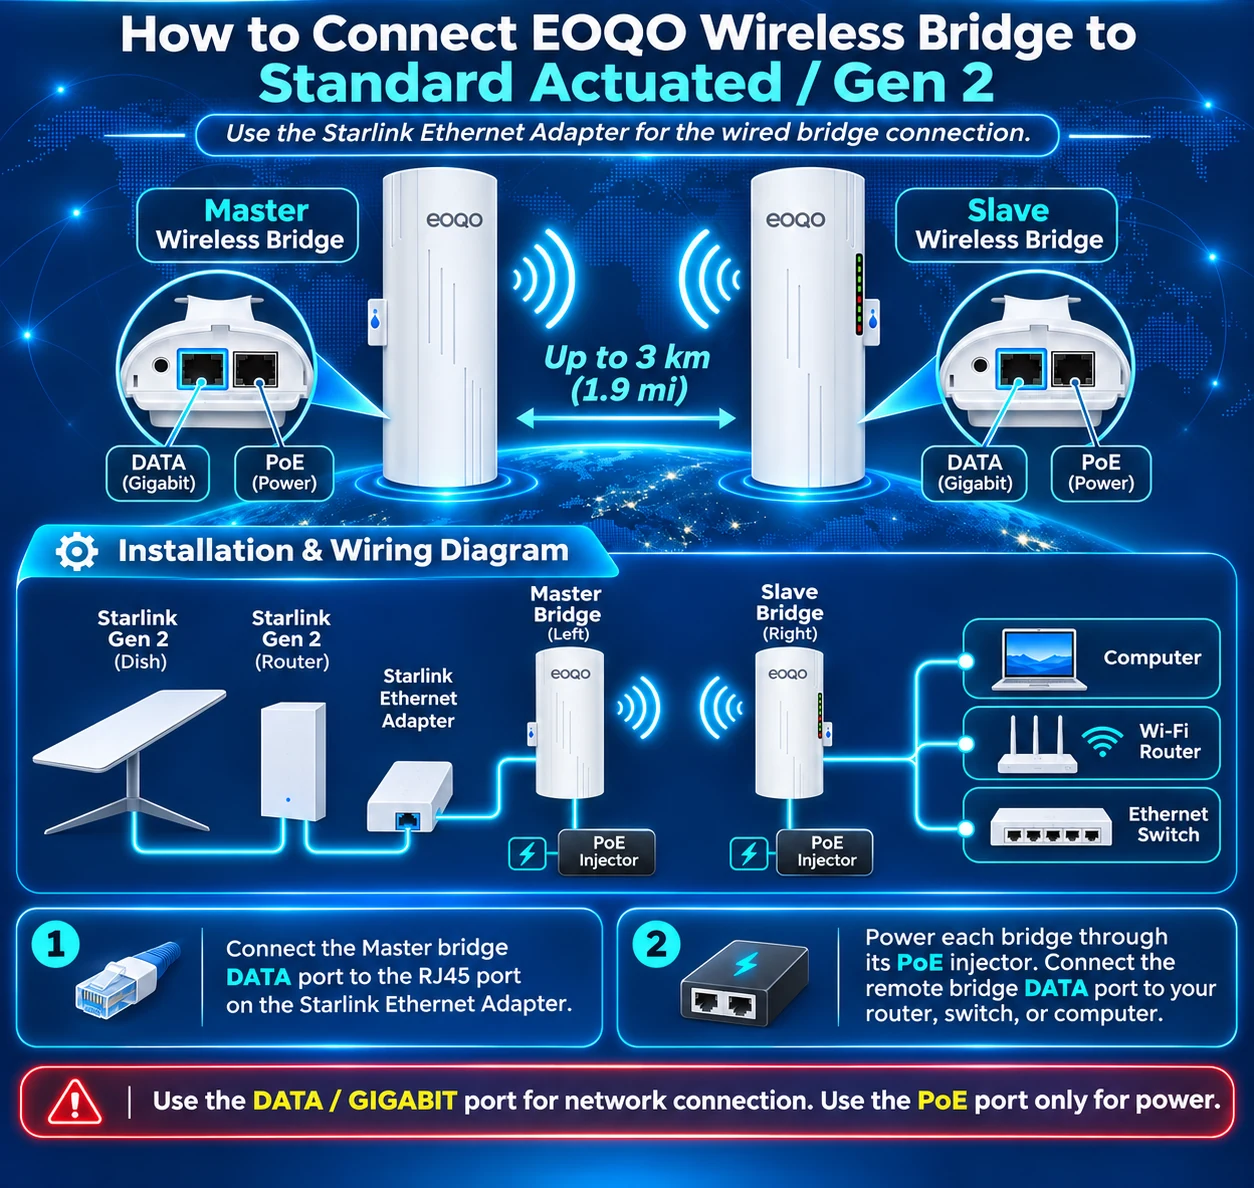
Installation note: The Gen 2 Ethernet Adapter is separate from the EOQO bridge injectors.
3G. Starlink Enterprise
Enterprise supplies native wired Ethernet through its power supply.
- Install the Enterprise terminal with its dedicated Starlink power supply.
- Connect the power supply Ethernet output to the EOQO Master data/network input.
- Power the paired bridges and attach an appropriate router, switch or other network equipment at the remote end.
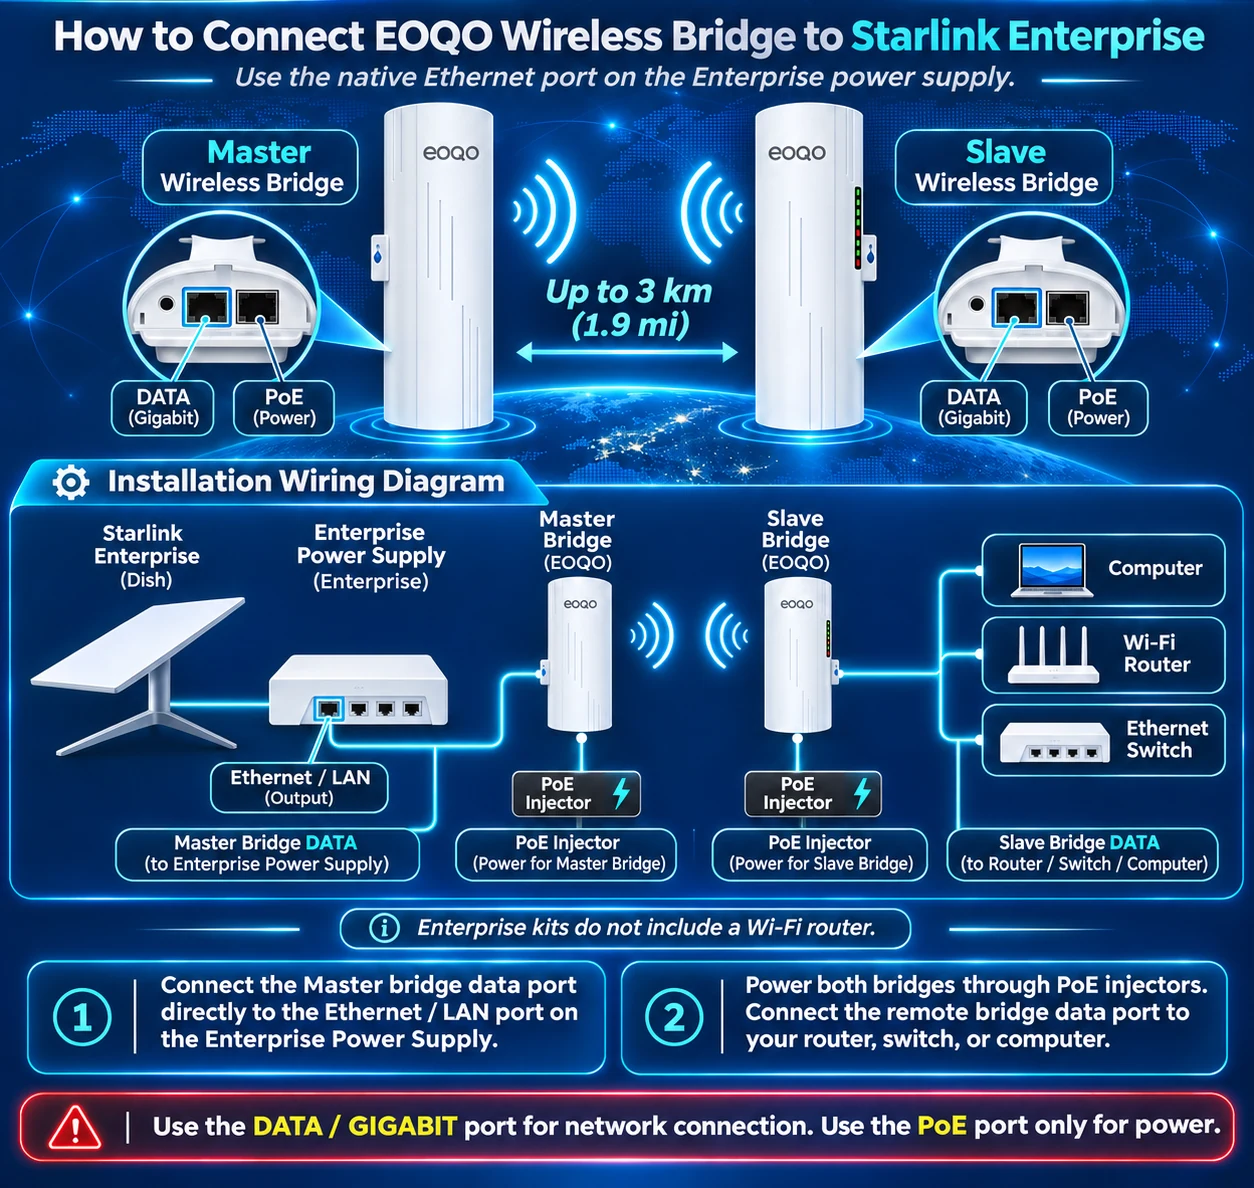
Installation note: Enterprise kits do not normally include a Wi-Fi router. Verify whether your network requires a gateway.
3H. Starlink Performance Gen 3
Performance Gen 3 uses an Advanced Power Supply with a wired LAN connection.
- Install the Performance terminal and Advanced Power Supply with the manufacturer-supplied cables.
- Use the Advanced Power Supply LAN output and a suitable Ethernet cable for the EOQO Master network/data input.
- Power and align the EOQO bridges and configure the destination router or switch.
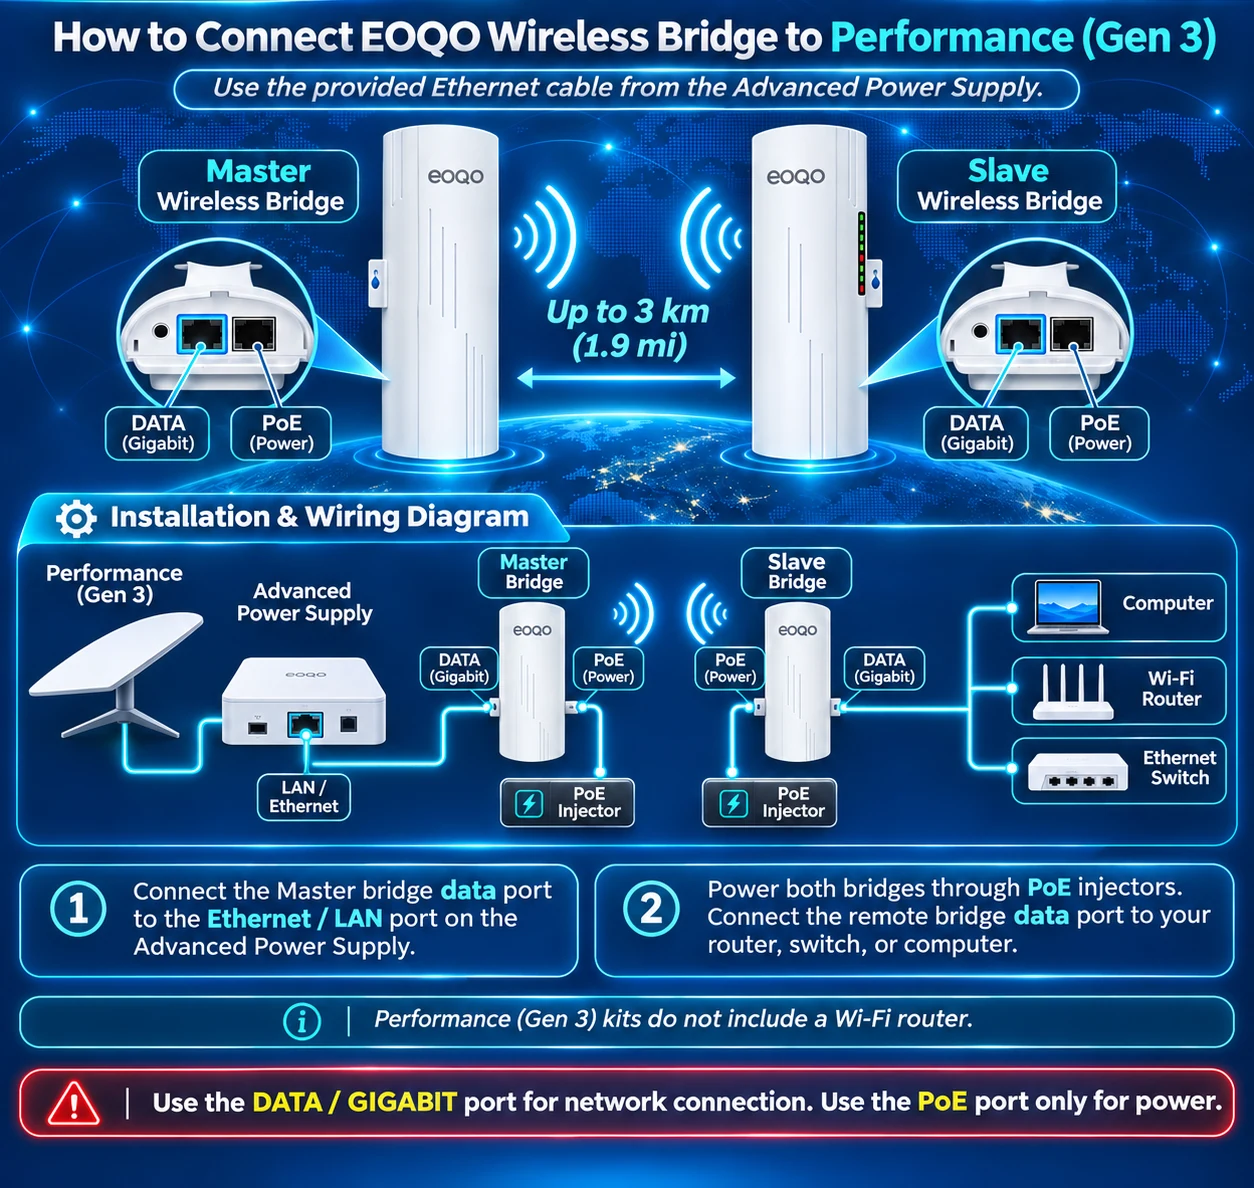
Installation note: If using a downstream third-party router, consult the Starlink instructions for DHCP and any app-access static route.
3I. Starlink Performance Gen 2
Performance Gen 2 uses a dedicated power supply with built-in Ethernet.
- Install the Performance Gen 2 terminal and its dedicated power supply.
- Connect the dedicated supply Ethernet output to the EOQO Master bridge data/network input.
- Use the correct bridge power injectors and connect the remote side to a configured network device.
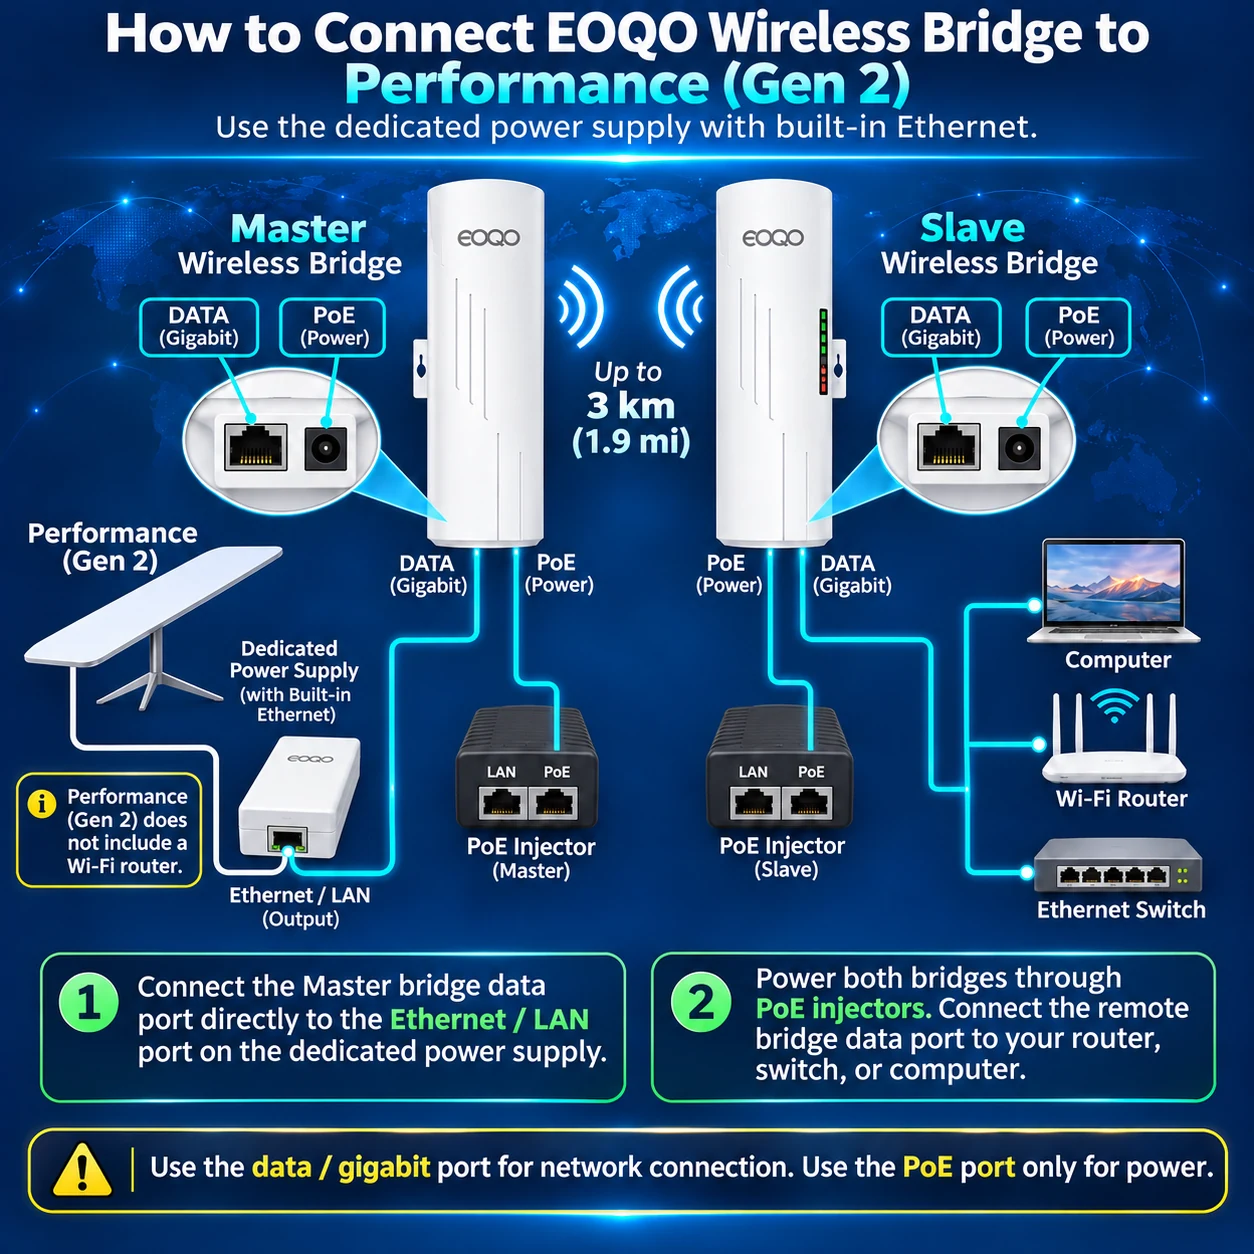
Installation note: A separate Starlink Ethernet Adapter is not required for this powered Ethernet output.
4. Verify the EOQO bridge ports before connecting power
The diagrams above explain which Starlink-side Ethernet output to use. The EOQO bridge power and data wiring depends on the exact EOQO product, not on the Starlink kit.
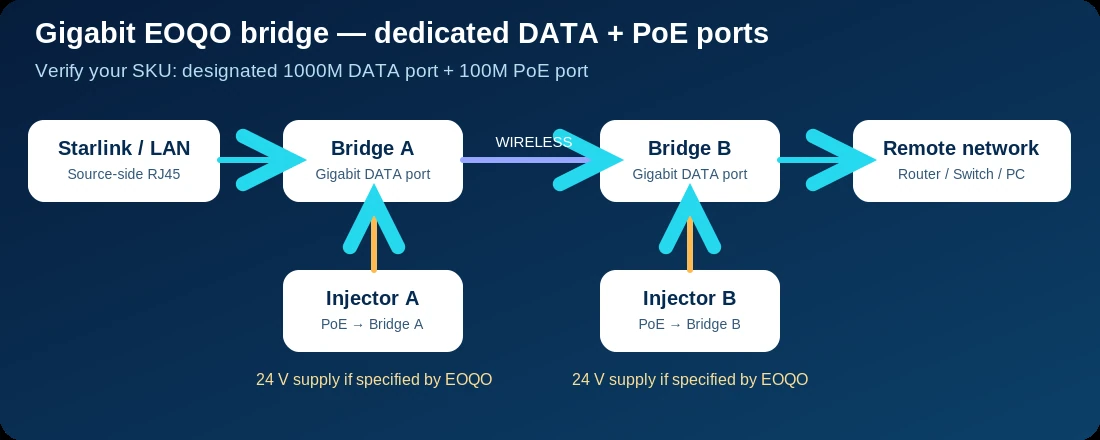
Gigabit EOQO bridge with separate DATA and PoE inputs
For models with a separate Gigabit DATA port and dedicated PoE power input, connect the Starlink LAN to the Master DATA port, connect the correct EOQO injector PoE output to the Master PoE input, and repeat the matching power connection on the Slave side. Use the Slave DATA output for your remote network.
100 Mbps EOQO bridge with Ethernet passing through its injector
For models where the EOQO injector transports both network data and passive PoE, connect Starlink LAN to the Master injector LAN socket, Master injector POE to the Master bridge PoE socket, then at the remote end connect Slave bridge PoE to the Slave injector POE and Slave injector LAN to your downstream network.
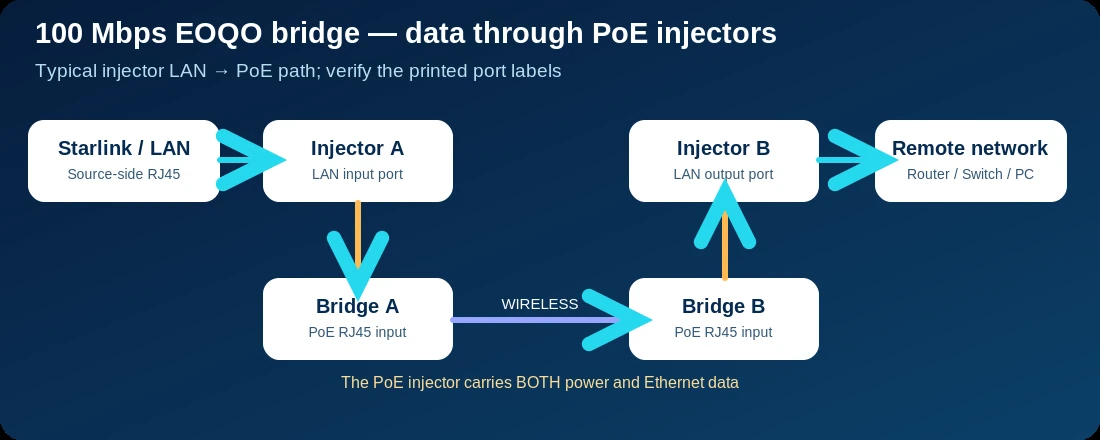
Electrical safety: Starlink Dual PoE, EOQO passive PoE and third-party active PoE are not interchangeable. Check your exact EOQO voltage, pinout and port labels. Never send passive PoE into a Starlink LAN port or computer. A PoE port can carry Ethernet data as well as power; the phrase "power only" in marketing artwork should not be interpreted as a statement that no data travels through that cable.
5. Installation checklist
- Verify Starlink is online before beginning the bridge setup.
- Identify the EOQO bridge model and its approved PoE voltage.
- Bench-test Master and Slave at short distance before installing outdoors.
- Mount both bridge antennas with clear line of sight and align their direction.
- Use weatherproof outdoor cable routing and drip loops.
- Verify that the destination network receives an IP address and can access the Internet.
- When Starlink is already the main router, consider access-point mode at the remote building to avoid unwanted double NAT.
6. Troubleshooting and support
- No bridge power: Check injector input, correct voltage and the assigned port.
- Bridge link is down: Verify the pair is configured correctly and antennas are aligned.
- No remote Internet: Test the Starlink Ethernet output and the remote-side Ethernet port separately.
- Slow wireless speed: Gigabit RJ45 does not mean gigabit wireless throughput. Check interference, distance and line of sight.
For help, contact EOQO Support with your EOQO bridge SKU, Starlink kit name, router model and cable-port photos.
Illustrations are conceptual and not substitutes for hardware-specific electrical instructions. Equipment bundles vary by market. Starlink is a third-party trademark and EOQO is not affiliated with Starlink.