The customize mode is more complicated than the auto mode, you should have network knowlege, otherwise it may lost connection or no internet, we strang suggest when you first time use the wireless bridge, please choose auto mode to running the device, after your understood and get more experience than you can switch to customize mode. for auto mode please visit Auto Mode Shortcut Guide for more details.
1.How to Access and Set via Computer
1.1 connect to the computer for configuration
1.11 Connect the PoE adapter to the wireless bridge via network cable, the bridge gets power from the PoE adapter, does not need DC power adapter.
1.12 Connection A: the POE port of the power adapter to the LAN port of the bridge
Connection B: the LAN port of the power adapter to the LAN port of the computer

1.13 Check the numeric on the LED indicator of the wireless bridge, for example: the numeric is 1, and the mode switch of the wireless bridge is at “A” position, then the IP address of the wireless bridge is 192.168.255.101, if the mode switch of the wireless bridge is at “B” position, then the IP address of the wireless bridge is 192.168.255.201, please refer the 1.13.1 LED number & IP chart.

1.13.1 LED Number & IP Chart:
| LED Indicator Display Value | (A)Master Mode IP | (B)Slave Mode IP | 2.4G ID | 5.8G ID |
| 0 | 192.168.255.100 | 192.168.255.200 | 0 | 0 |
| 1 | 192.168.255.101 | 192.168.255.201 | 1 | 165 |
| 2 | 192.168.255.102 | 192.168.255.202 | 2 | 161 |
| 3 | 192.168.255.103 | 192.168.255.203 | 3 | 157 |
| 4 | 192.168.255.104 | 192.168.255.204 | 4 | 153 |
| 5 | 192.168.255.105 | 192.168.255.205 | 5 | 149 |
| 6 | 192.168.255.106 | 192.168.255.206 | 6 | 48 |
| 7 | 192.168.255.107 | 192.168.255.207 | 7 | 44 |
| 8 | 192.168.255.108 | 192.168.255.208 | 8 | 40 |
| 9 | 192.168.255.109 | 192.168.255.209 | 9 | 36 |
| a | 192.168.255.110 | 192.168.255.210 | 10 | 140 |
| b | 192.168.255.111 | 192.168.255.211 | 11 | 132 |
| c | 192.168.255.112 | 192.168.255.212 | 13 | 124 |
| d | 192.168.255.113 | 192.168.255.213 | 96 | 116 |
| e | 192.168.255.114 | 192.168.255.214 | 50 | 108 |
| f | 192.168.255.115 | 192.168.255.215 | 55 | 100 |
1.13.2. Modify your computer’s IP address to 192.168.255.xxx,(xxx is from 1 -254), please be careful, the computer’s IP address can not be the same as the wireless bridge, and they must be in the same network segment, please google how to modify computer IP address, it is simple step.
1.14 How to configure your PC IP address: 192.168.255.xxx:
a. Find the network icon at the bottom right corner of the screen, click it to open the Network & Internet settings.

b. Select Ethernet and click “Change Adapter Options”.

c. Find the network connection you are using, right click it and select “Properties”

d. Double-click the “Internet Protocol version 4(TCP/IPv4)” go to IP config interface:

e. Configure your computer IP address as 192.168.255.xxx(xxx is a figure 2-254), note: the Pc’s IP can not be the same as the bridge.

1.15 We provide a software for window system to search the IP address, you can download it by click ZLLink Device Tool
on the download page, select CPE software tool, click to download and unzip it, you can see the software icon as below diagram:

Double click this sofware, it will display below interface:

1. Click the down arrow, please refer arrow "1"
2. Click the scan button, please refer arrow "2"
System will start searching the connected wireless bridge, after a few seconds you can see the IP address on the IP address column.
1.16 Log into master bridge and slave bridge control panel
1.16.1 After you modified your computer’s IP address, open the browser and enter the IP address of the wireless bridge to access, for example, enter “192.168.255.204" on the browser address column, you can access your bridge control panel.

The browser login interface as below diagram:

Note: If enter the ip address, the screen does not display the login interface, please check the network cable connection, and make sure your computer's IP address must be 192.168.255.xxx.
Enter the Username and Password, the default user name and password is "admin / admin"
select language to “English”, click “Login” to confirm and go to the below interface:

On "Quick Setup" menu, you can modify the user password, click "Apply" button to confirm
The master bridge output WiFi hot point at auto mode, we need to enter the password to access it, how do we find the password? please refer the following content to get it.
When the "DIP Switch Control" is enabled, the bridge has pre-programed the WiFi hot point name(SSID) and password, you can click "Setting" of the left menu, and click "wireless" you can view and change the password if needed:
The name and password is pre-programed, it has different name and password when the bridge works at different channel, but only change the last two or three numbers.
Fox example: the WiFi SSID name is "CPE5G_5G161", and the default password is "zllinkcpe123456161", if the name is "CPE5G_5G153", and the password should be "zllinkcpe123456153", the last three numbers of the password is match to the last three numbers of the SSID name.
1.2 Bridge Setting

On the bridge setting menu, you can set the bridge parameters
DIP Switch Control: check it to enable auto mode, press the "RST" button is functional, for the operation details please refer page 8, uncheck it to disable it, the "RST" button is not functional, the bridge works in customization mode, you can set the bridge parameters for customized function.
Note: if you unchecked the "DIP Switch Control", the device is works at customization mode, it will not auto pairing and "RST" button not functional, please be careful, it may lose the connection of your bridges after your configured.
If you are not familiar with network technology, please checked the "DIP Switch Control", system works at auto mode, and do not make any changes.
Mode: you can select A(master) and B(Slave) mode
Matching ID: you can select bridge working frequencies, please refer the 9.13.1 chart to find out the number matching to 5.8G frequencies, for example: "40(5200MHZ)", 40 is match as below diagram:
| LED Indicator Display Value | (A)Master Mode IP | (B)Slave Mode IP | 2.4G ID | 5.8G ID |
| 8 | 192.168.255.108 | 192.168.255.208 | 8 | 40 |
The channel is 8, for (A)master mode the IP address is 192.168.255.108, for (B)slave mode the IP address is 192.168.255.208
Fixed IP address: here you can change the bridge's IP address, it must be in this format 192.168.255.xxx, after changed, click "OK" button to save the settings.
Host Name: you can set the bridge with a special name for remember.
1.3 Access Point Setting

DHCP: check to enable, uncheck to disable, this function must enable, otherwise it can not assign the IP address to bridge
Fixed IP Address: set a customize IP address, should be in this IP segment: 192.168.255.xxx
Fixed Netmask: set the netmask address
DNS server: set the DNS server if needed
Click "Next" to go to Wireless setting interface:

phy0 channel: set the working frequencies, same as Matching ID
Wireless: check to enable wireless, uncheck to close wireless function
Name(SSID): here you can enter your own SSID name
Authorization: you can select "Open" or "WPA2-PSK"
Wireless Bridge(WDS): check to enable wireless bridge function, uncheck to close the function, we suggest to enable it
Click "Next" to go to Management setting interface

Mac Layer Management Service: check to enable, uncheck to disable, we suggest to enable
Click "OK" button to confirm and save the settings.
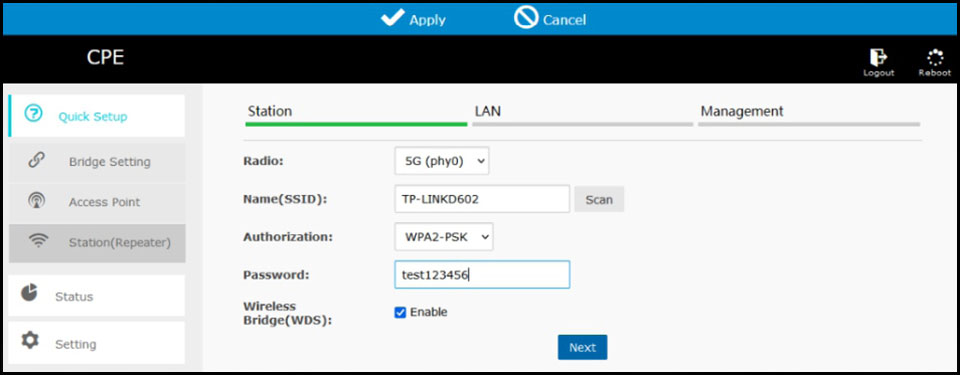
1.4 Station(Repeater) Setting

This interface can set your device works as wireless access point repeater, support repeat LAN or WiFi source
Radio: 5G(phy0), only support 5G
Name(SSID): click "Scan" button to searching the WiFi source, it will pop a window for you choose, refer the WiFi source selection chart on next page
Authorization: it will auto change after your scanned WiFi source
Wireless Bridge(WDS): check to enable, uncheck to disable, if use for repeater mode, you need to disable this function, for wireless bridge connection usage you need enable it.
WiFi source select chart

On this pop window, you can select your router name and click > to setect the WiFi router, here we choose "TP-LINKD602"
Please enter your router WiFi password in the password column

CLick "Next" button to go to "LAN" setting interface
Note: if you use as repeater mode, must disable "Wireless Bridge(WDS)" function, otherwise it will not working.

Wireless Repeater: check to enable, uncheck to disable, for repeater mode, you need enable it
Name(SSID): Enter the WiFi hot point name
Authorization: you can select "Open", or "WPA2-PSK", if you choose "WPA2-PSK", you also need to set the password.
DHCP: check to enable, uncheck to disable, must enable
Fixed IP Address: set an customize IP address
Fixed Netmask: set the netmask address
DNS Server: set the DNS server if needed
Check "Next" button to go to Management setting interface:

Mac Layer Management Service: check to enable, uncheck to disable, we suggest to enable
Click "OK" button to confirm and save the settings.
Click "Setting" of the left menu, and click "Wireless", it will display below interface, you can check the parameters again

TP-LINKD602 is the WiFi router source, home-cpe353 is the bridge's WiFi hot point, for AP repeater access please disable the wireless bridge(WDS), must enable the home-cpe353, click "Apply" button at the top of the screen to confirm.
Now you can use your cell phone or laptop to connect the WiFi hot point for internet surfaces.
Click "Status" of the left menu, system will display the following interface:

For customization setting is a little bit hard for newbie, if you can not set or system halts, please press and hold the bridge's "RST" button over 10 seconds, when the LED display flashes numeric then release it, system will return to factory mode.
The factory mode is enough for most of usage, it will auto pair and easy to change the channel without computer access, the master bridge also output WiFi hot point, you just need to find the password and enter it to get access.
The customization mode could be used for point to multiple points for networks access and video surveillance, once it is connected, you can use the computer to access each bridges by different IP address, your computer's IP should be same segment to the bridges, the format is 192.168.255.xxx, when connected to your WiFi router source, the IP will change to this format: 192.168.0.xxx, you need to take care, if there is no response, please reset it.
2. Application
2.1 Point to Point Connection:
A. point to point long range video surveillance diagram:
Distance: 0.6 ~ 1.9 miles /1KM - 3KM with non-blocking obstacles

B. point to point long range network extend diagram:
Distance: 0.6 ~ 1.9 miles /1KM - 3KM with non-blocking obstacles

C. Multiple network equipment long range access diagram:
Distance: 0.6 ~ 1.9 miles /1KM - 3KM with non-blocking obstacles

Extend the network to your warehouse, barns and garages near your home
2.2 Point to Multi-Point Connection:
Point to multi-point long range video surveillance diagram:
Distance: 0.6 ~ 1.9 miles /1KM - 3KM with non-blocking obstacles

2.3 Multiples Clients Connection:
Distance: 0.6 ~ 1.9 miles /1KM - 3KM with non-blocking obstacles

The customize mode is support point to point method, and point to multiple point, you can set it as your requirement, for the more details please visit Wireless Bridge User Manual
For any more questions please contact us by email johnwen0822@gmail.com or skype: johnwen0822